Open top menu


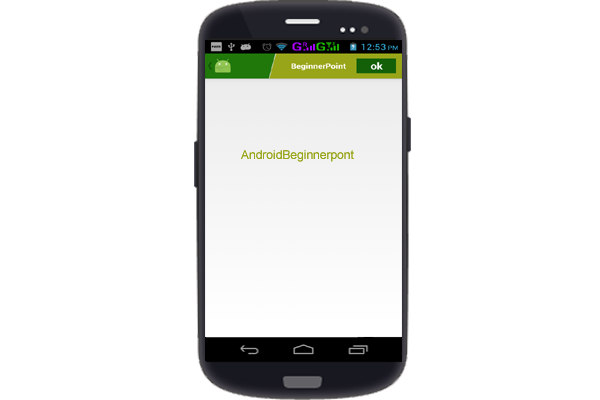
 In this blog we will explain how to used Custom ActionBar layout in android.try this

...................................................................................................................................................................

final ActionBar abar = getActionBar();
//line under the actionbar
abar.setBackgroundDrawable(getResources().getDrawable(R.drawable.preview));
View viewActionBar = getLayoutInflater().inflate(R.layout.acttionbar_relative, null);
//Center the textview in the ActionBar !
ActionBar.LayoutParams params = new ActionBar.LayoutParams(
        ActionBar.LayoutParams.WRAP_CONTENT,
        ActionBar.LayoutParams.MATCH_PARENT,
        Gravity.CENTER);
TextView textviewTitle = (TextView) viewActionBar.findViewById(R.id.actionbar_textview);
textviewTitle.setText("BeginnerPoint");
textviewTitle.setTextSize(14);
abar.setCustomView(viewActionBar, params);
abar.setDisplayShowCustomEnabled(true);
abar.setDisplayShowTitleEnabled(false);
abar.setDisplayHomeAsUpEnabled(true);
abar.setHomeButtonEnabled(true);
...................................................................................................................................................................


Explain Briefly Click Here 


Read more


In this blog implement custom ActionBar programatically.  we will add new RelativeLayout on ActionBar via ActionBarLayout, because ActionBarLayout get  ActionBar height and width .
 explain below...try

first you can past the Image inside res/drawable folder...


second you can create acttionbar_relative.xml class inside res/layout folder....

...................................................................................................................................................................
<RelativeLayout xmlns:android="http://schemas.android.com/apk/res/android"    
android:layout_width="fill_parent"    
android:layout_height="wrap_content"    
android:padding="10dp"    
android:orientation="horizontal"    
android:gravity="center_vertical">

    
<TextView        
android:id="@+id/actionbar_textview"        
android:layout_width="wrap_content"        
android:layout_height="40dp"        
android:maxLines="1"        
android:gravity="center_vertical"
android:clickable="false"        
android:focusable="false"        
android:longClickable="false"       
android:textStyle="bold"        
android:text="heloghth"
android:textSize="18sp"        
android:textColor="#ffffff"        
android:layout_centerVertical="true"        a
ndroid:layout_centerHorizontal="true" />

<Button        
android:id="@+id/btnAddExpense"        
android:layout_width="wrap_content"        
android:layout_height="40dp"        
android:text="ok"        
android:textColor="#ffffff"        
android:textStyle="bold"        
android:background="#136009"        
android:layout_alignParentRight="true"        
android:layout_centerVertical="true"/>
</RelativeLayout>
...................................................................................................................................................................


MainActivity.java. you can get ActionBar before  setContentView(R.layout.activity_main); view and then .....
..................................................................................................................................................................
package com.example.sarvesh.testproject;

import android.app.ActionBar;
import android.app.Activity;
import android.support.v7.app.AppCompatActivity;
import android.os.Bundle;
import android.view.Gravity;
import android.view.View;
import android.widget.TextView;

public class MainActivity extends Activity {

    @Override    protected void onCreate(Bundle savedInstanceState) {
        super.onCreate(savedInstanceState);
        final ActionBar abar = getActionBar();
        abar.setBackgroundDrawable(getResources().getDrawable(R.drawable.preview));//line under the action bar        View viewActionBar = getLayoutInflater().inflate(R.layout.acttionbar_relative, null);
        ActionBar.LayoutParams params = new ActionBar.LayoutParams(//Center the textview in the ActionBar !                ActionBar.LayoutParams.WRAP_CONTENT,
                ActionBar.LayoutParams.MATCH_PARENT,
                Gravity.CENTER);
        TextView textviewTitle = (TextView) viewActionBar.findViewById(R.id.actionbar_textview);
        textviewTitle.setText("BeginnerPoint");
        textviewTitle.setTextSize(14);
        abar.setCustomView(viewActionBar, params);
        abar.setDisplayShowCustomEnabled(true);
        abar.setDisplayShowTitleEnabled(false);
        abar.setDisplayHomeAsUpEnabled(true);
        abar.setHomeButtonEnabled(true);
        setContentView(R.layout.activity_main);
    }
}
...................................................................................................................................................................


Read more


In this blog explain how to get Substring from String in android..

String str  = "1234567890" ;
String Char  =  "ABCDEFGHIJKLMNOPQRSTUVWXYZ";

for example...

Step first - get string legth
...................................................................................................................................................................

//get length
int lenth=Char.length();

// you get last string
String Lastchar=Char.substring(Char.length()-1); //same as  str
Log.e("Lastchar...",Lastchar);
.................................................................................................................................................................


Step 2- get Substring
...................................................................................................................................................................

// you get last string 
String substr=Char.substring(0,3); //same as  str
Log.e("substring...",substr);

output:- substr - ABC;
...................................................................................................................................................................


Step 2- How to remove space
...................................................................................................................................................................
 String str = the good boy

// you get last string 
String substr=str.substring(0,4).trim(); //same as  str

Log.e("substring...",substr);

output:- substr- the;
Read more


In this post explain how to Convert Julian Date to Normal Date in android.


In this blog we will used  Indian Calender date formula.....
 Calendar calendar = Calendar.getInstance();
  calendar.setTime(date);

 Its  GregorianCalendar...........................................................
 Calendar cal = new GregorianCalendar();


activity_main.xml.
...................................................................................................................................................................
<LinearLayout xmlns:android="http://schemas.android.com/apk/res/android"
    xmlns:tools="http://schemas.android.com/tools"
    android:id="@+id/fragment"
    android:layout_width="match_parent"
    android:layout_height="match_parent"
    android:orientation="vertical"
      >

    <ImageView
        android:id="@+id/imageView1"
        android:layout_width="wrap_content"
        android:layout_height="wrap_content"
        android:src="@drawable/logoweb" />

    <TextView
        android:id="@+id/textView1"
        android:layout_width="wrap_content"
        android:layout_height="wrap_content"
        android:text="Enter Julian Date"
        android:layout_marginLeft="7dp" />

    <EditText
        android:id="@+id/editText1"
        android:layout_width="wrap_content"
        android:layout_height="40dp"
        android:layout_margin="7dp"
        android:ems="10"
        android:paddingLeft="5dp"
        android:background="@drawable/register_cover" >

        <requestFocus />
    </EditText>

    <Button
        android:id="@+id/button1"
        style="?android:attr/buttonStyleSmall"
        android:layout_width="wrap_content"
        android:layout_height="wrap_content"
        android:layout_marginLeft="7dp"
        android:text="Get" />

    <TextView
        android:id="@+id/textView2"
        android:layout_width="wrap_content"
        android:layout_height="wrap_content"
        android:text="Normal Date"
        android:layout_marginLeft="7dp"
        android:layout_marginTop="40dp" />

    <EditText
        android:id="@+id/editText2"
        android:layout_width="wrap_content"
        android:layout_height="40sp"
        android:paddingLeft="5dp"
        android:ems="10"
        android:enabled="false"
        android:layout_margin="7dp"
        android:background="@drawable/register_cover" />
     
</LinearLayout>
..................................................................................................................................................................


MainActivity.java
..................................................................................................................................................................
package com.androidbeginner.testcode;

import java.text.ParseException;
import java.text.SimpleDateFormat;
import java.util.Calendar;
import java.util.Date;
import java.util.GregorianCalendar;

import android.annotation.SuppressLint;
import android.app.Activity;
import android.graphics.Typeface;
import android.os.Bundle;
import android.view.View;
import android.view.View.OnClickListener;
import android.widget.Button;
import android.widget.EditText;
import android.widget.TextView;
import android.widget.Toast;

@SuppressLint("ResourceAsColor")
public class MainActivity extends Activity {


@SuppressLint("NewApi")
@Override
protected void onCreate(Bundle savedInstanceState) {
super.onCreate(savedInstanceState);
getActionBar().setTitle("Get NormalDate");  
setContentView(R.layout.activity_main);

Button btn=(Button)findViewById(R.id.button1);
btn.setOnClickListener(new OnClickListener() {

@Override
public void onClick(View v) {

EditText textstyle1 = (EditText) findViewById(R.id.editText1);
EditText textstyle2 = (EditText) findViewById(R.id.editText2);
 

if((!textstyle1.getText().toString().equals("")) && (textstyle1.getText().length()==6)){

//get the string from edittesxt
String julianteda=textstyle1.getText().toString();
//then convert the string in normak date
String normalDate = null;

try {
normalDate = convertJulianToNormal(julianteda);
} catch (ParseException e) {
// TODO Auto-generated catch block
e.printStackTrace();
}
//set text in texedit text
textstyle2.setText(normalDate);

} else {
Toast.makeText(getApplication(), "Please enter 6 digit Julian date", Toast.LENGTH_LONG).show();
}
 

}
});
  
} 

public static String convertJulianToNormal(String dateStr)
throws ParseException {

Calendar cal = new GregorianCalendar();

cal.set(Calendar.YEAR, Integer.parseInt(dateStr.substring(0, 4)));
cal.set(Calendar.DAY_OF_YEAR, Integer.parseInt(dateStr.substring(4)));

Date parsedDate = cal.getTime();
return new SimpleDateFormat("mm-dd-yyyy").format(parsedDate);
}

}
...................................................................................................................................................................
Read more


 In this blog we will explain how to enable Move to Sdcard Button and allow android application  move to Sdcard , you can installed application on the sdcard. show picture...


 In Android, you can go to device Settings -->Applications ->ManageApplications -> and then click on your app to view the app details. You will find a ‘Move to SD Card’ button which is available for some apps and for some apps it will be disabled (not click-able) for other apps. By default it is disabled for your application.


  1. preferExternal :- this request that your application may installed on the external storage, but the system does not guarantee that your application will be installed on the external storage. 
  2. auto :- this indicate that your application may be installed on the external storage, but you don’t have a preference of install location.  


manifest,xml
..................................................................................................................................................................
<?xml version="1.0" encoding="utf-8"?>
<manifest xmlns:android="http://schemas.android.com/apk/res/android"
    package="com.androidbeginner.testcode"
    android:versionCode="1"
    android:installLocation="preferExternal"
    android:versionName="1.0" >

    <uses-sdk
        android:minSdkVersion="11"
        android:targetSdkVersion="19" />
    
    <uses-permission android:name="android.permission.INTERNET"/>
      
    <application
        android:allowBackup="true"
        android:icon="@drawable/ic_launcher"
        android:label="@string/app_name"
        android:theme="@style/AppTheme" >
        
        <activity
                 android:name="com.androidbeginner.testcode.MainActivity"
                 android:label="@string/app_name" 
                 android:hardwareAccelerated="false">            
            <intent-filter>
                <action android:name="android.intent.action.MAIN" />
                <category android:name="android.intent.category.LAUNCHER" />
            </intent-filter>
            
        </activity>
        
        
    </application>

</manifest>
...................................................................................................................................................................


Read more